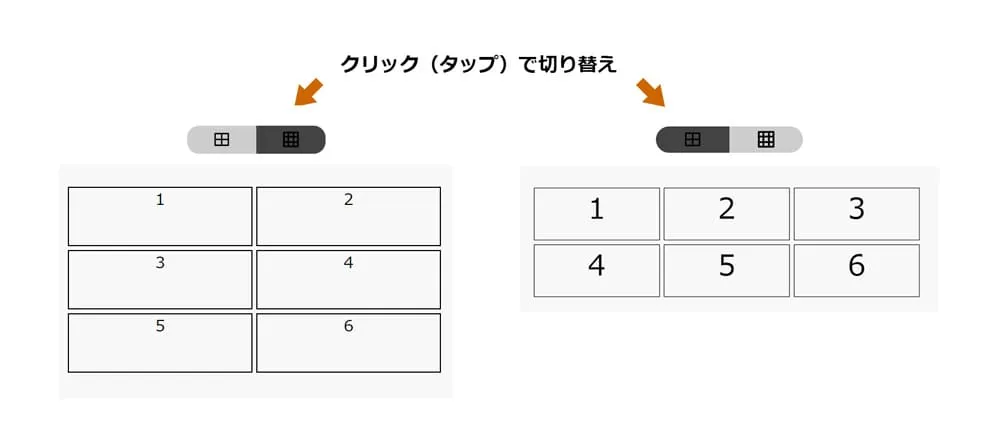
スマホ表示でボックスを並べるレイアウトのときに、2列にするか3列にするか迷ったことがあり、切り替えができるようにしておこうと思って作ったときのサンプルです。

See the Pen line change button by eating2003 (@eating2003) on CodePen.
目次
デモ
サンプルコード
    <div class="btnWrap">
        <button id="ChangeBtn" aria-label="2列3列ビューの切り替え"></button>
    </div>

    <div class="boxwrap">
        <div class="box">1</div>
        <div class="box">2</div>
        <div class="box">3</div>
        <div class="box">4</div>
        <div class="box">5</div>
        <div class="box">6</div>
    </div>
div.btnWrap{
    width: 100%;
    height: auto;
}

#ChangeBtn {
    display: block;
    width: 35%;
    height: 7vw;
    margin: 20px auto 0;
    background-color: transparent;
    position: relative;
    vertical-align: middle;
    max-height: 50px;
}

#ChangeBtn::before {
    content: " ";
    display: inline-block;
    width: 50%;
    height: 100%;
    margin: 0;
    padding: 0;
    border-bottom: 1px solid transparent;
    position: absolute;
    top: 0;
    left: 0;
    color: white;
    line-height: 8vw;
    box-sizing: border-box;
    vertical-align: baseline;
    font-size: 3.5vw;
    transition: 0.5s;
    background-image: url(https://eating2003.com/demo/demoImg/layout-grid-line.svg);
    background-repeat: no-repeat;
    background-size: 25%;
    background-position: center;
    background-color: #cdcdcd;
    border-radius: 3vw 0 0 3vw;
}

#ChangeBtn::after {
    content: " ";
    display: inline-block;
    width: 50%;
    height: 100%;
    margin: 0;
    padding: 0;
    border-bottom: 1px solid transparent;
    position: absolute;
    top: 0;
    right: 0;
    color: white;
    line-height: 8vw;
    box-sizing: border-box;
    vertical-align: baseline;
    font-size: 3.5vw;
    transition: 0.5s;
    background-image: url(https://eating2003.com/demo/demoImg/grid-line.svg);
    background-repeat: no-repeat;
    background-size: 30%;
    background-position: center;
    background-color: #434343;
    border-radius: 0 3vw 3vw 0;
}

#ChangeBtn.Btn3::before {
    background-color: #434343;
}

#ChangeBtn.Btn3::after {
    background-color: #cdcdcd;
}

.boxwrap {
    list-style: none;
    display: flex;
    width: auto;
    height: auto;
    vertical-align: top;
    flex-wrap: wrap;
    justify-content: center;
    padding: 20px 5px;
    margin: 10px auto;
    background: #f8f8f8;
}

.boxwrap .box {
    display: flex;
    justify-content: center;
    width: calc(100%/2 - 2%);
    height: 15vw;
    margin: 0 1% 1% 0;
    vertical-align: top;
    position: relative;
    border-collapse: collapse;
    border: 1px solid black;
    box-sizing: border-box;
    transition: 0.4s;
    max-height: 100px;
    font-size: 4vw;
}

.boxwrap.line3 .box {
    width: calc(100%/3 - 3%);
}
const retuChangeButton = document.querySelector("#ChangeBtn");
const changeTaisyou = document.querySelector(".boxwrap");
retuChangeButton.addEventListener('click', function() {
console.log('クリックされました!');
if( changeTaisyou.classList.contains('line3') === true ){
retuChangeButton.classList.remove('Btn3');
changeTaisyou.classList.remove('line3');
}else{
retuChangeButton.classList.add('Btn3');
changeTaisyou.classList.add('line3');
};
}, false);サンプルコードの説明
ボタンタップ(クリック)時に、Javascript(Jquery無し)で、クラスを追加と削除を行うことで実現するサンプルです。
デフォルトではクラスは追加されておらず、2列表示にしています。

ボタンタップ(クリック)をすると、
 ボタンには、クラスBtn3を付与
 列表示エリアには、クラスline3付与
します。
const retuChangeButton = document.querySelector("#ChangeBtn"); //ボタン定義
const changeTaisyou = document.querySelector(".boxwrap"); //列のエリア定義

//ボタンがクリックされたら実行する関数
retuChangeButton.addEventListener('click', function() {

    //もし、列のエリアがクラスline3をもっている場合(3列表示の時にクリックされた場合)
    if( changeTaisyou.classList.contains('line3') === true ){
        retuChangeButton.classList.remove('Btn3'); //ボタンのクラスBtn3を取り除く
        changeTaisyou.classList.remove('line3'); //列のエリアのクラスline3を取り除く

    //列のエリアがクラスline3をもっていない場合(2列表示の時にクリックされた場合)
    }else{
        retuChangeButton.classList.add('Btn3'); //ボタンにクラスBtn3を追加する
        changeTaisyou.classList.add('line3'); //列のエリアにクラスline3を追加する
    };

}, false);
あらかじめ2列表示の時のCSSを作っておき、 ボタンタップ(クリック)された時のクラスに対して3列のときのCSSを追加します。 今回は、widthをcalc(100%/2 - 2%)と、calc(100%/3 - 3%)を切り替えることで2列3列の切り替えにしています。 ※-2%や-3%は、2列と3列の時のboxのmarginを引いて、横幅100%に収めています。
/* 2列の表示 */
.boxwrap .box {
    width: calc(100%/2 - 2%);
}

/* 3列の表示 */
.boxwrap.line3 .box {
    width: calc(100%/3 - 3%);
}
ボタンは、クラスの有無で背景色を変えることで切り替えを表現しています。
/* ボタンは、クラスが有る無しで背景色を逆転 */
#ChangeBtn::before {
    background-color: #cdcdcd;
}
#ChangeBtn::after {
    background-color: #434343;
}

#ChangeBtn.Btn3::before {
    background-color: #434343;
}
#ChangeBtn.Btn3::after {
    background-color: #cdcdcd;
}
.addEventListener()の補足
1. 基本的なかたち(無名関数)
対象要素.addEventListener('click', function() {
    //ここに処理を書く
}, false);
2. 関数を別で書く場合(関数名を定義)
function something() {
    //ここに処理を書く
};

対象要素.addEventListener('click', something, false);
3. アロー関数を使って書く場合
対象要素.addEventListener('click', () => {
    //ここに処理を書く
});


